
Nice car. Black makes the car look mean.
Great to see that the paint job will be done right. I know its hard to be patient but it will be worth it!

SLR rebuild ....... Finally
Started by
_LH8VD69_
, May 14 2011 02:56 AM
56 replies to this topic
#27
 _LH8VD69_
_LH8VD69_
-

- Guests
Posted 11 August 2011 - 02:46 AM
what did you end up doing with the interior? (seats) as i would be interested in them for my vk project.
Cheers Blake
Ok M8 they are out of the car all good to go. Im putting them in the for sale section as well.Im pretty sure they are original torana bolt pattern.
Cheers
#28
_LH8VD69_
_LH8VD69_
-
- Guests
Posted 11 August 2011 - 03:06 AM
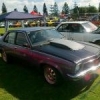
Well lots has happened since the last update. I have my baby here at home with me with parts scattered all over the show. The paint turned out shmicko in the end so im wrapped. The last couple of days i have spent rewiring lights, applying sound deadener under the guards ,boot ect. Funny enough i totally enjoyed cleaning out inside the doors,guards and applying a mix of rust proof cavity wax and fish oil.

I pulled out the old carpet and underlay ready for some new heat/ insulation mat and was wondering if the underlay would be sufficient? It has some kind of thin bendable metal running through the middle of it. Possibly lead? What do you think?


I knew i had a couple of different seatbelt in the car but this is stupid

I'll go see Seatbelt solutions and hopefully we can work something out. I hate that black /orange plastic one. It looks like an old ford one.
The garage is so cluttered with stuff i couldnt get a decent pic of her with the new paint and i fly back to work tomorrow but ill be sure to get pics up when i can
I pulled out the old carpet and underlay ready for some new heat/ insulation mat and was wondering if the underlay would be sufficient? It has some kind of thin bendable metal running through the middle of it. Possibly lead? What do you think?
I knew i had a couple of different seatbelt in the car but this is stupid
I'll go see Seatbelt solutions and hopefully we can work something out. I hate that black /orange plastic one. It looks like an old ford one.
The garage is so cluttered with stuff i couldnt get a decent pic of her with the new paint and i fly back to work tomorrow but ill be sure to get pics up when i can
#29
_sting_
_sting_
-
- Guests
Posted 11 August 2011 - 09:26 AM
Hi slr nice car ,black is a hard colour to keep clean how do you do it, you are blessed as well with a rust free car to ,bar the odd spot it makes life for the rebuild easy , as for ebay i have found sometimes they are dearer than bying from a shop I look at the part on ebay then if they have a shop i ring or email them to see if i can get it cheeper if i don't pay through ebay ,you have to be carefull who u do that with .Keep up the great work its looking good ,and get back to work 
cheers sting
cheers sting
#30
_LH8VD69_
_LH8VD69_
-
- Guests
Posted 13 August 2011 - 05:55 PM
Well after having the grille painted in gloss then to the original satin ( and paying for the pleasure on both occasions) it turns out the brand new chrome strips I picked up don't fit. It turns out Holden made grilles with and without the strips , something I wasn't aware of :-/ the strip grilles have little slots and the whole area is different. I did think about attacking it with a tool but went against it as the grille itself is like new. When I got it the part where the strip goes was painted silver and looked pretty good. Oh well. On the bright side I managed to score another grille today off egay so on with the show !
#31
_LH8VD69_
_LH8VD69_
-
- Guests
Posted 24 August 2011 - 01:48 AM
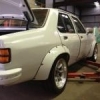
Ok well i havent updated for a while and the reason is ive been workin my butt off putting everything back together ,replacing everything i can with new stuff ect . Ive replaced the footbrake setup with new stuff along with the correct release knob. I initially bought the twist & pull one before realising mine came with the symbol one.  I cavity waxed the butt off the doors and every nook n cranny i could find. I done 3 layers of tar /sound deadner in the boot,floorpan and wheel arches.

Once id done all that i threw on the wheels to check if the flares went on at the right angle of the dangle.. Oh and to check the hairy toe in the pic

I rewired the lights ,fitted the mirrors and spend a few hours trying to get all the panel shop dust out of the vents. I had a bit of drama with the number plate fitment as torana rear plate bolt on from the bottom and there werent any holes there so a couple of spacers up top and fitted it on the outside of the holding lip. went on well. The number plate rubbers from rares were waaay to thick and held the plate a mile off the car at the top so a stanely knife sorted that out. its pretty silly how they werent right though. This next pic was taken early today. I just needed to polish the tank and fit the sticker at this stage.

Whilst i was under there i cleaned out the drain holes in front of the rear wheels so i could fill them with wax and fish oil. It took me over an hour to do as i think about 2 tonne of tiny little rocks came out ! They just would stop comming out...lol The drop tank came up a treat with good ole purple polish.

The front number plate although not a big deal required another mod as the front is V shaped and i didnt want to attempt to bend the plate so i made this little thingy.

It looks from the pic like it sits out n would stupid but actually looks spot on from the front
The next pics are just a few of the new paint. im lookin forward to giving it a polish


The new sticker looks good im finkin !

I have everything i need for the interior except the carpet and kick panels which i have ordered. I have a guy from the forum giving me a hand with things like the roof lining and glueing door tops ect hopefully the goods should arrive before i get back from work . That brings me pretty much up to date. I have thrown the old drivers seat back in and driving down to 'Seatbelt Solutioms' tommorow to organise new belts
I cavity waxed the butt off the doors and every nook n cranny i could find. I done 3 layers of tar /sound deadner in the boot,floorpan and wheel arches.Once id done all that i threw on the wheels to check if the flares went on at the right angle of the dangle.. Oh and to check the hairy toe in the pic
I rewired the lights ,fitted the mirrors and spend a few hours trying to get all the panel shop dust out of the vents. I had a bit of drama with the number plate fitment as torana rear plate bolt on from the bottom and there werent any holes there so a couple of spacers up top and fitted it on the outside of the holding lip. went on well. The number plate rubbers from rares were waaay to thick and held the plate a mile off the car at the top so a stanely knife sorted that out. its pretty silly how they werent right though. This next pic was taken early today. I just needed to polish the tank and fit the sticker at this stage.
Whilst i was under there i cleaned out the drain holes in front of the rear wheels so i could fill them with wax and fish oil. It took me over an hour to do as i think about 2 tonne of tiny little rocks came out ! They just would stop comming out...lol The drop tank came up a treat with good ole purple polish.
The front number plate although not a big deal required another mod as the front is V shaped and i didnt want to attempt to bend the plate so i made this little thingy.
It looks from the pic like it sits out n would stupid but actually looks spot on from the front
The next pics are just a few of the new paint. im lookin forward to giving it a polish
The new sticker looks good im finkin !
I have everything i need for the interior except the carpet and kick panels which i have ordered. I have a guy from the forum giving me a hand with things like the roof lining and glueing door tops ect hopefully the goods should arrive before i get back from work . That brings me pretty much up to date. I have thrown the old drivers seat back in and driving down to 'Seatbelt Solutioms' tommorow to organise new belts
Edited by LH8VD69, 24 August 2011 - 01:52 AM.
#32
notna
-

- Members
-

- 706 posts
Forum Fixture
- Name:Reverse of username
- Location:Sydney
- Car:1976 LX L32 SL/R
- Joined: 21-May 07
Posted 24 August 2011 - 05:58 PM
Paint looks awesome. Lovin those reflection pics!
#33
_Liam_
_Liam_
-
- Guests
Posted 24 August 2011 - 07:25 PM
I was looking at it and thinking "Why is he taking a picture of his tools... What is wrong with the roof... Oh wait thats the paint reflection haha"
Looks nice mate.
Looks nice mate.
#34
_LH8VD69_
_LH8VD69_
-
- Guests
Posted 25 August 2011 - 07:39 PM
Well I can't say enough great things about Graham from 'Seatbelt Solutions' I rocked up there and he took the time to explain how he could help me and has gone out of his way to see I get the right stuff for my baby. The belts should be ready by the end of next week which is a fantastic turn around! Fingers crossed the carpet arrives, the window guy is available and it should all roll in together next break 
#35
_nial8r_
_nial8r_
-
- Guests
Posted 25 August 2011 - 08:09 PM
every time i see a Black Torana it make me want another one. the paint looks perfect 
Oh and the " hairy toe " that thing is almost the size of a squash raquet

Oh and the " hairy toe " that thing is almost the size of a squash raquet
#36
_LH8VD69_
_LH8VD69_
-
- Guests
Posted 06 September 2011 - 09:59 AM
Well after lots of sound deadner ive layed a nice thick underlay down and the new black carpet. I have to say there is certianly alot of trimming here cutting there for a carpet perpose made. Isnt a floor pan a floorpan?? I bought a heat gun which helped on the tougher parts but the part that goes over the tunnel behind the console is taking some modding. Its like its made for a much larger tunnel.
Although music in the car isnt high on the importance list i decided to pull out the 'old' JVC cd player along with the old 6x9's from the rear and 5-6" front door speakers and replace them with a nice new Kenwood deck, qaulity speaker wire into a set of R spec Alpine 6x9's in the rear. It sounds a treat too. No plans on cutting any of the new door trims. I mounted the speakers into the new (original style) rear shelf. The shelf needed trimming too?? Arent all rear shelfs the same dimentions? Anyway here's how it looks!

Today if all goes well the roof lining ,all vynal door and pillar trims are going in and hopefully time permitting ill fit the door trims, handles, sunvisors, and if im lucky i will have time to continue removing the old window tint. The heat gun works a treat
Well times a wastin id better get cracking !
Although music in the car isnt high on the importance list i decided to pull out the 'old' JVC cd player along with the old 6x9's from the rear and 5-6" front door speakers and replace them with a nice new Kenwood deck, qaulity speaker wire into a set of R spec Alpine 6x9's in the rear. It sounds a treat too. No plans on cutting any of the new door trims. I mounted the speakers into the new (original style) rear shelf. The shelf needed trimming too?? Arent all rear shelfs the same dimentions? Anyway here's how it looks!
Today if all goes well the roof lining ,all vynal door and pillar trims are going in and hopefully time permitting ill fit the door trims, handles, sunvisors, and if im lucky i will have time to continue removing the old window tint. The heat gun works a treat
Well times a wastin id better get cracking !
#37
Richo
-

- Members
-
- 12 posts
Forum Participant
- Name:Richo
- Location:Australia
- Car:LH 308 4dr, LH SLR 308.
- Joined: 05-January 11
Posted 07 September 2011 - 07:09 PM
Ive seen this car go through its re-build and honestly no pic can do it justice, you can park in my drive way any day.
Look'n good Mr Bling..!!!!
Look'n good Mr Bling..!!!!
#38
_LH8VD69_
_LH8VD69_
-
- Guests
Posted 08 September 2011 - 02:43 AM
Cheers Richo !
Well dramas a plenty today after fitting the door trims I'm now having pro lens shutting the doors as the pockets on the lower part of the door being quite thick hitting against the scuff guards? I pulled off the scuff guards and started cutting back the carpet underneath so they will sit down further but became to much this late into my break ( fly back to work tomorrow) so I decided I would crack out the grease and wax remover to rid the car of the 5 tonne of black window grease and glue overburden from the trimmer then the good ole clay bar followed by a polish. A bit of relaxation therapy on the last night does wonders more pics when I get back. I should have the seatbelts back then provided I can overcome the door closing issue it will be on with the show
Well dramas a plenty today after fitting the door trims I'm now having pro lens shutting the doors as the pockets on the lower part of the door being quite thick hitting against the scuff guards? I pulled off the scuff guards and started cutting back the carpet underneath so they will sit down further but became to much this late into my break ( fly back to work tomorrow) so I decided I would crack out the grease and wax remover to rid the car of the 5 tonne of black window grease and glue overburden from the trimmer then the good ole clay bar followed by a polish. A bit of relaxation therapy on the last night does wonders
more pics when I get back. I should have the seatbelts back then provided I can overcome the door closing issue it will be on with the show
#39
StephenSLR
-
- Members
-
- 6,717 posts
Oh My, Don't you post alot
- Name:Stephen
- Location:Sydney
- Car:1976 LX SL/R
- Joined: 12-November 05
Posted 08 September 2011 - 08:22 AM
I pulled off the scuff guards and started cutting back the carpet underneath so they will sit down further
On my car, from memory, there is no carpet between the scuff plate and door sill, the carpet only goes up enough to tuck under the lip of the plate or possibly slightly over the lip of the sill but definitely not between the flat part of the plate and door sill. I imagine if carpet was under the plate it would trap more rain water there.
s
#40
_LH8VD69_
_LH8VD69_
-
- Guests
Posted 08 September 2011 - 06:33 PM
It doesnt really go unto the flat part but it's definitely to long either way. What makes it even worse is I have replaced the little door latches that screw into the body. They are most likely not aligned or something. If it turns out the door trim is to thick at the bottom I'm not sure how I'll attack that one?I pulled off the scuff guards and started cutting back the carpet underneath so they will sit down further
On my car, from memory, there is no carpet between the scuff plate and door sill, the carpet only goes up enough to tuck under the lip of the plate or possibly slightly over the lip of the sill but definitely not between the flat part of the plate and door sill. I imagine if carpet was under the plate it would trap more rain water there.
#41
_DrFegg_
_DrFegg_
-
- Guests
Posted 08 September 2011 - 10:25 PM
Love the black, shiny and mean. Great work.
#42
_LH8VD69_
_LH8VD69_
-
- Guests
Posted 18 September 2011 - 12:08 PM
Well its been an interesting week awaiting the seatbelts before i could move forward with the rest of the interior instal. I had the front seat bracket mounts powder coated, Graham from Seatbelt Solutions found me another stalk matching my others which was fantastic. I was disappointed to say the least when i had to drill out the holes in the new retractables. I was under the impression these belts would fit the torana bolts and it was the cheaper Klipan belts from Supercheap Autos were the ones that required drilling?

It wasnt til after i got to this stage

and went to bolt the top part of the rear seatbelts in that i realized the guy who fitted the roof lining didnt put the holes for the seatbelts..Grrrr
Once the rear seat was in i moved on to the front seats and went with the suggested soldering iron to make the seat bolt holes....WRONG !!! After spending ages trying this method it worked out easier just to cut the carpet ,bolt the seats directly to the floor and fold the carpet back accross. I loosely bolted the front of the seat in then sat on the seat to imprint on the carpet, rolled the winder all the way forward

and lifted the rear of the seat up doing this

to make roon for my big clumsy hands. Slow but effective
So after at about 1:30am this morning it looked like this

Today the console goes in ,rear shelf tidy up,normal am/fm antenna on the rear window which the guy who popped the windows out broke and didnt tell me requires fixing, new digital antenna goes in the titned part of the front windscreen.
It wasnt til after i got to this stage
and went to bolt the top part of the rear seatbelts in that i realized the guy who fitted the roof lining didnt put the holes for the seatbelts..Grrrr
Once the rear seat was in i moved on to the front seats and went with the suggested soldering iron to make the seat bolt holes....WRONG !!! After spending ages trying this method it worked out easier just to cut the carpet ,bolt the seats directly to the floor and fold the carpet back accross. I loosely bolted the front of the seat in then sat on the seat to imprint on the carpet, rolled the winder all the way forward
and lifted the rear of the seat up doing this
to make roon for my big clumsy hands. Slow but effective
So after at about 1:30am this morning it looked like this
Today the console goes in ,rear shelf tidy up,normal am/fm antenna on the rear window which the guy who popped the windows out broke and didnt tell me requires fixing, new digital antenna goes in the titned part of the front windscreen.
#43
_gen3torrie_
_gen3torrie_
-
- Guests
Posted 18 September 2011 - 11:15 PM
very nice mate,
such a nice torana
such a nice torana
#44
StephenSLR
-
- Members
-
- 6,717 posts
Oh My, Don't you post alot
- Name:Stephen
- Location:Sydney
- Car:1976 LX SL/R
- Joined: 12-November 05
Posted 19 September 2011 - 10:20 AM
I was under the impression these belts would fit the torana bolts and it was the cheaper Klipan belts from Supercheap Autos were the ones that required drilling?
That's disappointing to hear, they must all buy their mounts from the same place. I'm surprised nobody has asked the fabricator to drill larger holes but my guess is they're also used on some other model(s) that require the smaller hole.
s
#45
_LH8VD69_
_LH8VD69_
-
- Guests
Posted 22 September 2011 - 10:36 PM
Well doing all the little boring fiddley bits ATM like removing the old window tint , door alignment , new hoses around the engine bay ect. Notably the brake booster vacuum hose which was all flat not allowing the correct flow. I've bought some glass polish and hoping I can polish ip the old glass to a nice standard i bought a dash lens kit and sticker kit for the gauges. Im not sure if i should put the stickers on as it kind of takes away the original age look?? I guess so does all the other new stuff I guess....didn't add any pics this time as it all seems a little boring. I'm having fun though
i bought a dash lens kit and sticker kit for the gauges. Im not sure if i should put the stickers on as it kind of takes away the original age look?? I guess so does all the other new stuff I guess....didn't add any pics this time as it all seems a little boring. I'm having fun though
#46
_LH8VD69_
_LH8VD69_
-
- Guests
Posted 16 October 2011 - 10:37 PM
Ok, time for an update. I started by pulling out the dash cluster so i could revive the old faded colour with a sticker kit and a set of new lenses.

As it turns out once i pulled the old scratched hazy lenses off the dials themselves were in better condition than i thought. So instead of using the sticker kit i just coloured the red back in where it once was, threw on the new lenses and good as new
Since part of the dash was apart i got a little silly and

went nuts pulling it all out for a good scrub,realignment and repaint of the silver. It took a little while but came out tops !

I sorted the boot out

Done some finishing touches on the rear seat area

Rear shelf

I just like this pic so i'm throwing it in

IThe engine bay has been tidied somewhat but its still works in progress. Im getting rid of the braided pipe and rocker covers ,hiding the wiring ect but here it is in its current state

My ' SLR FINALLY' went for a run around the block tonight !! yay !

I had the windows tinted in 20% as well. It looks a treat i think.
Tomorrow it off to Wilkinsons suspension. looking over a few things as well as sorting out the UC stuff to go in the front and dropping the rear down as well. Tuesday its off to the auto sparky's to sort out a few minor things. Oh i joined the Combined Torana Club as well here in WA so i'm looking forward to meeting the guys.
Cheers
As it turns out once i pulled the old scratched hazy lenses off the dials themselves were in better condition than i thought. So instead of using the sticker kit i just coloured the red back in where it once was, threw on the new lenses and good as new
Since part of the dash was apart i got a little silly and
went nuts pulling it all out for a good scrub,realignment and repaint of the silver. It took a little while but came out tops !
I sorted the boot out
Done some finishing touches on the rear seat area
Rear shelf
I just like this pic so i'm throwing it in
IThe engine bay has been tidied somewhat but its still works in progress. Im getting rid of the braided pipe and rocker covers ,hiding the wiring ect but here it is in its current state
My ' SLR FINALLY' went for a run around the block tonight !! yay !
I had the windows tinted in 20% as well. It looks a treat i think.
Tomorrow it off to Wilkinsons suspension. looking over a few things as well as sorting out the UC stuff to go in the front and dropping the rear down as well. Tuesday its off to the auto sparky's to sort out a few minor things. Oh i joined the Combined Torana Club as well here in WA so i'm looking forward to meeting the guys.
Cheers
#47
_TJ355_
_TJ355_
-
- Guests
Posted 16 October 2011 - 11:15 PM
All i can say is wow this has 2 be 1 of my Fav builds on here love it!
#49
eyepeeler
-
- Members
-
- 1,963 posts
Forum Fixture
- Location:Perth
- Car:77 SL Hatchback, Chrome Yellow L34, LX IPRA Race Car the White Ghost
- Joined: 16-August 08
Posted 17 October 2011 - 07:48 PM
I think I saw your car out at Midland about 2 weeks ago comming out onto the the Great Easterm Hwy. It looked tough on the road. Well done on the build, credit to you. Cars like yours are all the insipration I need for my car.........
#50
_LH8VD69_
_LH8VD69_
-
- Guests
Posted 18 October 2011 - 04:19 PM
Well I've finally had my suspension woes sorted ! I've been bashing my head against the wall for some time over this as the suspension shop I'd been dealing with couldn't find any reason why I was having issues. After Peter from wilkinshaw suspensions quickly checked it over picked up the 'original' balljoints that were still in tge car were buggered and trailing arm bushes , one in particular was shot ! Wtf?? Wouldn't that be the first thing you would look at when looking for issues? Anyway I can't speak highly enough of the boys from wilkinshaw suspension for their help not to mention the decent price and bag of goodies ! Thanks again the UC control and steering arms also make my baby better to drive. I'm sick as a dog right now but I have a smile from ear to ear 
the UC control and steering arms also make my baby better to drive. I'm sick as a dog right now but I have a smile from ear to ear


1 user(s) are reading this topic
0 members, 1 guests, 0 anonymous users

