

after 2 1/2 yrs its finally ready for paint
Started by
_gtr161s_
, Sep 13 2007 09:39 PM
85 replies to this topic
#26

lcgtrrob
-

- Members
-

- 207 posts
Forum Member
- Name:Rob
- Location:wollongong
- Joined: 29-December 06
Posted 01 October 2007 - 07:46 PM
top job,good on ya,iv'e recently painted my gtr side stripes but the edges are a bit furry in places,did you get nice sharp edges on your stripes
#27
_gtr161s_
_gtr161s_
-

- Guests
Posted 02 November 2007 - 07:53 PM
lcgtrrob- didnt get to reply to your msg as i left overseas for kathmandu. My stripe edges came out perfect, i used the blue 3m tape
#28
lcgtrrob
-
- Members
-
- 207 posts
Forum Member
- Name:Rob
- Location:wollongong
- Joined: 29-December 06
Posted 03 November 2007 - 09:44 AM
gtr161s-i used the normal poxy masking tape and pin stripe to mark out my stripes,thats probably where i went wrong,but still it didn't come out too bad-Rob
#29
bullitA9X
 View Garage
-

- Members
-
- 4,168 posts
Oh My, Don't you post alot
- Location:south australia
- Joined: 08-November 05
View Garage
Posted 03 November 2007 - 10:04 AM
gtr161s bloody brilliant mate top work  keep the pics coming cant wait to see it all together
keep the pics coming cant wait to see it all together
#30
_rorym_
_rorym_
-
- Guests
Posted 03 November 2007 - 11:19 AM
Jesus Kev you dont do things by half do you?..Thats stunning..Congrats...
R
R
#31
_gtr161s_
_gtr161s_
-
- Guests
Posted 03 November 2007 - 02:12 PM
thanks for all the praise guys.
I've been on hols in Kathmandu trekking in the Himalayas for a month so its time to finish her off. Been hanging to do the engine so hopefully that will be done before xmas.
I've been on hols in Kathmandu trekking in the Himalayas for a month so its time to finish her off. Been hanging to do the engine so hopefully that will be done before xmas.
#32
_RdS_
_RdS_
-
- Guests
Posted 03 November 2007 - 05:42 PM
very, very, nice work mate.
looks like you did the rear quarter perfectly, and loving the lead-work. more original than bog!
cant wait to see it all finished.
looks like you did the rear quarter perfectly, and loving the lead-work. more original than bog!
cant wait to see it all finished.
#33
lcgtrrob
-
- Members
-
- 207 posts
Forum Member
- Name:Rob
- Location:wollongong
- Joined: 29-December 06
Posted 03 November 2007 - 05:53 PM
have you got all original running gear or are you using something else
#34
_gtr161s_
_gtr161s_
-
- Guests
Posted 04 November 2007 - 05:55 PM
lcgtrrob -
Im running a 2600s its out of a 4/70, beggars cant be choosers.
Mine is a 4/71 which means it should run an opel but i have an m20 in it at the moment.
If i find an opel it will go in storage for that day if i ever sell her.
It came out with a factory 3.08 lsd which its still has.
Im running a 2600s its out of a 4/70, beggars cant be choosers.
Mine is a 4/71 which means it should run an opel but i have an m20 in it at the moment.
If i find an opel it will go in storage for that day if i ever sell her.
It came out with a factory 3.08 lsd which its still has.
#35
lcgtrrob
-
- Members
-
- 207 posts
Forum Member
- Name:Rob
- Location:wollongong
- Joined: 29-December 06
Posted 04 November 2007 - 07:00 PM
it's a credit to you doing all the work yourself and doin such a good job 
#36
_gtr161s_
_gtr161s_
-
- Guests
Posted 04 November 2007 - 07:55 PM
Thanks mate. I will get a kick out of her when she's on the road.
Always loved the note they had, and they really turn heads where ever you go.
Always loved the note they had, and they really turn heads where ever you go.
#37
_studricho_
_studricho_
-
- Guests
Posted 07 November 2007 - 08:34 AM
Great job on the car and an awesome read. This sort of stuff keeps many torana freaks going when they feel like giving up.
Keep everyone up to date. That reminds me, i better get some pics of mine...
Keep everyone up to date. That reminds me, i better get some pics of mine...
#38
_GTR 33L_
_GTR 33L_
-
- Guests
Posted 08 November 2007 - 11:21 AM
Kev,TOP JOB,It would sound even better with a V8 
#39
_Keithy's_UC_
_Keithy's_UC_
-
- Guests
Posted 08 November 2007 - 11:52 AM
Great work Kev, thats very inspirational to some of us not-so-good-on-a-gun kinda guys!! Your work is brilliant! If i had the time and the ability to store my other UC outside i'd probably turn my garage into a booth as well. Not that any UC shapes up to your beaut rig!!
Cheers
Keith
Cheers
Keith
Edited by Keithy's_UC, 08 November 2007 - 11:54 AM.
#40
Heath
View Garage
-

- Administrators
-
- 18,403 posts
I like cars.
- Name:Heath
- Location:Eastern Suburbs, Melbourne
- Car:Heavily Modified UC Sunbird Hatchback
- Joined: 07-November 05
View Garage
Posted 08 November 2007 - 06:27 PM
Don't be modest.Not that any UC shapes up to your beaut rig!!
#41
_gtr161s_
_gtr161s_
-
- Guests
Posted 10 February 2008 - 05:30 PM
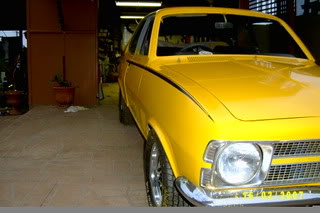
Bit of an update to finishing my car.
Spending time with my daughters xmas hols and starting a new job has meant not alot of time to finish off the paint work but this weekend i managed to cut and buff the passenger side.
After the shots below i turned her around to start on the other side....maybe next weekend the rest will be done
Really happy with the finish, has that typical acrylic look.
#42
_ezy_09s_
_ezy_09s_
-
- Guests
Posted 10 February 2008 - 06:42 PM
Very nice work there gtr161s..it is a credit to you for sure,love seeing top resto jobs on cars that deserve the love.
Keep the updates coming .
Keep the updates coming .
#44
_CraigA_
_CraigA_
-
- Guests
Posted 10 February 2008 - 06:51 PM
Another one very close to being saved. Looks like its going to turn out very nicely.
#45
_gtr161s_
_gtr161s_
-
- Guests
Posted 12 February 2008 - 04:34 PM
After all the time that has passed its easy to forget how much I slaved to get it to this stage...now as all I want to do is turn the key.
#46
_2runa_
_2runa_
-
- Guests
Posted 12 February 2008 - 05:33 PM
Hi gtr161s
great workmanship, you have given others on this site the inspiration to try
and have ago. Keep the pics coming as it shows everyone whats behind that
panel.... or how to approach it. As you know Pics speak louder than words, well
done.
Regards
2runa
great workmanship, you have given others on this site the inspiration to try
and have ago. Keep the pics coming as it shows everyone whats behind that
panel.... or how to approach it. As you know Pics speak louder than words, well
done.
Regards
2runa
#47
_2runa_
_2runa_
-
- Guests
Posted 13 February 2008 - 02:40 PM
Hi gtr161s
Can you explain the process for lead wiping, what works? Surface prep etc. Do you use 50/50, 70/30 solder,
Is kemtex differant to normal flux? What is the bi-carb/ brush for?
I have tried this before and its not easy on a verticle panel I have used a waxed wooden dolly to shape it , any suggestions.
2runa
#48
_gtr161s_
_gtr161s_
-
- Guests
Posted 14 February 2008 - 04:09 PM
2runa - I'll dig out my gear this weekend and list how i prep the panel etc and the materials used. (pic below)
I would'nt be game enough to try it on say a quarter panel as the heat will cause distortion but on the original lead wipe joints its a fairly simple process. My first attempt was on the turret joint, turned out really well and easy to finish

I would'nt be game enough to try it on say a quarter panel as the heat will cause distortion but on the original lead wipe joints its a fairly simple process. My first attempt was on the turret joint, turned out really well and easy to finish
#49
_2runa_
_2runa_
-
- Guests
Posted 14 February 2008 - 04:26 PM
I had an old chap tell me that he would heat the solder in a laddle, tip it in to a type of leather glove and .....wipe it on slowly  then use a wooden dolly to shape it together with a little heat.
then use a wooden dolly to shape it together with a little heat.
#50
_gtr161s_
_gtr161s_
-
- Guests
Posted 15 February 2008 - 05:28 PM
That method is close to how i did it.
here's the short version.
1) prep and clean the area to be lead wiped
2) tin with kemtex
3) heat the stick of lead till it goes like putty and work into seam
4) using a piece of hardwood (shaped like a spatchula) manipulate lead into seam, gently applying heat until it gives desired coverage. Note - hardwood is dipped in lard.
5) cut back excess lead with a cheese grater type tool.


1 user(s) are reading this topic
0 members, 1 guests, 0 anonymous users

